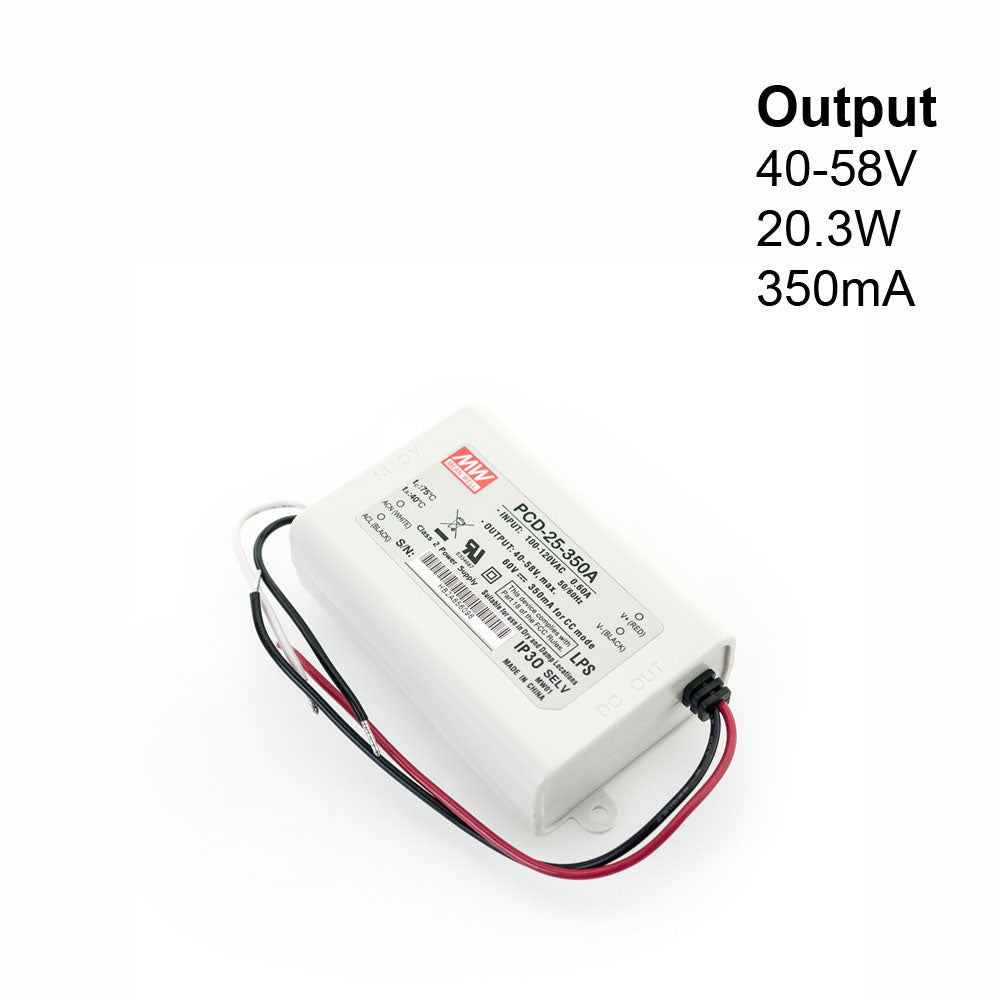
Mean Well Constant Current LED Driver 350mA 40-58V 20.3W, PCD-25-350A
Mean Well Constant Current LED Driver 350mA 40-58V 20.3W, PCD-25-350A
SKU: SKU:666561414955
Free Shipping
Free Shipping
- Get free shipping on purchases over $99!
Available Discounts
Available Discounts
- 10% off for a minimum qty of 10
- 15% off on purchases over $200
Shipping & Return Policy
Shipping & Return Policy
- 30 Days Return Policy
How do we ship our product?
GekPower will ship via the most reliable and time-efficient courier available depending on the location of the delivery.
Customers may provide GekPower with their own courier preference and can include an account number, if applicable, by writing the courier information in the "special instructions for the seller" section at the time of checkout.
Important Note: Delivery may take 3–4 days longer than the estimated date shown on the checkout page.
Free Shipping
For orders totalling $99 USD or above.
Free shipping is Not available for specific products; please check availability during checkout.
Why is there a shipping cost, even after exceeding the flat rate for a few products?
Product shipping costs are charged based on the quantity, size, and weight of the product. A surcharge will be applied to any oversized items.
When do we ship our products?
All orders are shipped through different couriers based on the priority you selected at checkout. All orders are shipped within one business day of purchase from Monday to Friday, excluding Canadian statutory holidays (see below). Any orders placed on Saturday or Sunday will be shipped the following week.
What if you want to cancel your order before it is shipped?
We accept cancellations and full refunds on all orders if the parcel has not been picked up by, or dropped off at, a courier.
How does our Return or Exchange Policy work?
Returns and exchanges are accepted within 30 days of the original purchase date.
Important information below:
- All returned products must be in new, resellable condition and in original packaging to be accepted as a valid return or exchange.
- If you decide to return an item from a free shipping order, the original shipping cost we paid to send the order will be deducted from your refund.
- If you paid for shipping at checkout, please note that shipping fees are non-refundable.
- Special orders, altered channels, strip lights, or assembled/disassembled products are not refundable.
- A 30% restocking fee will apply.
- Please allow up to two weeks for processing.
Orders returned due to incorrect or incomplete shipping addresses provided by the customer, refusal to accept or collect the package, failed delivery attempts, or packages marked as undeliverable/refused by the carrier will be treated as returns and are subject to the same return policy, including shipping charges and applicable restocking fees.
To submit a request for a return or exchange, please email sales@gekpower.com.
Tax & Duty Charge:
-
U.S. customers are exempt from customs duties - U.S. orders will be shipped directly from our U.S. warehouse.
Statutory Holidays in British Columbia, Canada 2026
January 1 - February 16 - April 3 - May 18 - July 1 - August 3 - September 7 - September 30 - October 12 - November 11 - December 25

Product Description
| Product | Constant Current LED Driver |
| Model | PCD-25-350A |
| Input Voltage | 100-120V AC |
| Input Current | 0.60A |
| Frequency | 50/60Hz |
| Output Voltage | 40-58V DC (60V max) |
| Output Regulated Current: | 350mA |
| Output Power | 20.3W |
| Dimmable | Yes |
| Weight | 0.2 kg |
| IP Rating | IP30 (Indoor Rated) |
| Ambient Temperature (Tc) | 75°C |
| Case Temperature (Ta) | 40°C |
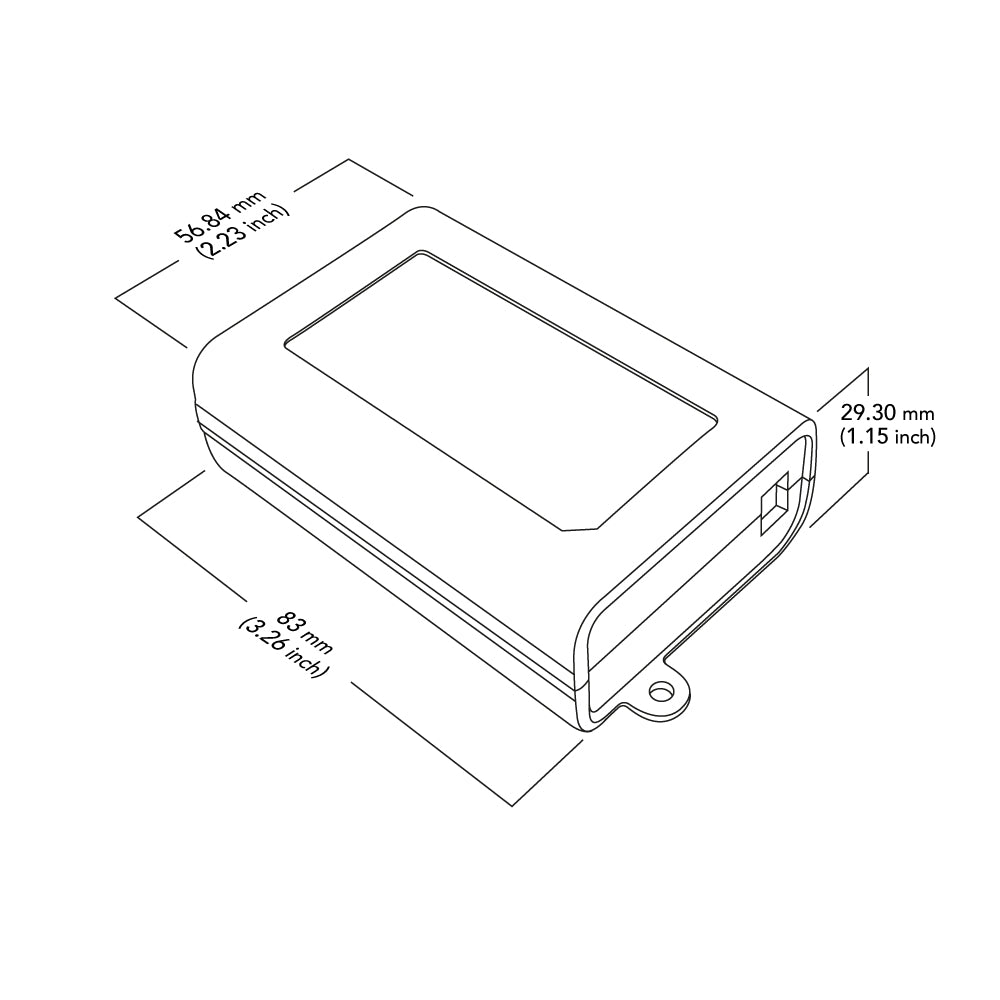
| Dimensions | 83 x 56.84 x 29.30mm (3.26 x 2.23 x 1.15 in) |
| Class Certification | Class 2/ Class II |
| Certification |

|
Features:
- Designed for LED lighting applications
- Provides regulated current of 350mA and output power of 20.3W
- Input voltage range: 100-120V AC, input current: 0.60A, frequency: 50/60Hz
- Output voltage range: 40-58V DC (with a maximum of 60V DC)
- Not dimmable and has an IP30 rating for indoor use only
- Ambient temperature rating: 40°C, case temperature rating: 75°C
- Mean Well Constant Current LED Driver 350mA 40-58V 20W, PCD-25-350A
- Certified as Class 2/Class II product